

In Part 1, I showed you how to compare two release branches within a repository. Now we dive into creating some release notes.
Let’s continue
In order to mark the work items which are candidate for the release notes, it is necessary to add a custom field to the work item, e.g. “Release branch”. Once that is done, the script can use it.
# Set Release branch field on workitems
foreach($workitem in $workitems) {

    $body = @(
@{
op = 'add'
path = '/fields/Custom.Releasebranch'
value = "$($releaseCurrent)"
}
)

    $jsonBody = ConvertTo-Json $body
    $uri = "$serverUri/$project/_apis/wit/workitems/" + $workitem + "?api-version=7.1-preview.3"
    $results = Invoke-RestMethod -Uri $uri -Method Patch -ContentType "application/json-patch+json" -Body $jsonBody -Headers $headers
}
Create query
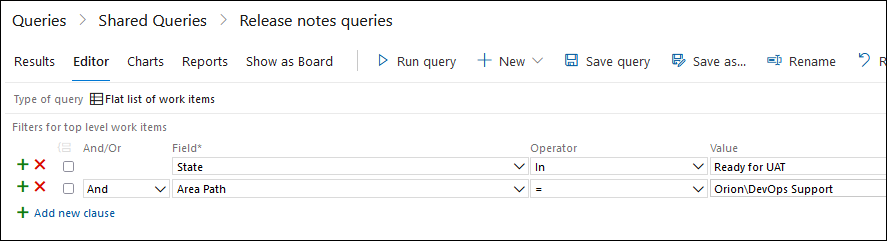
A query is needed to see which work items have the status “Ready for UAT” and will therefore be deployed to the UAT environment. Of course you can have different statuses.
Here is a very simple example, filtering on the status and the area path for a team.
Creating release notes
An Azure DevOps query will be used within the next script.
First some set up
# FIRST RUN set-private-token.ps1 to set environment variable
& $PSScriptRoot/set-private-token.ps1
$privateToken = $Env:privateToken

# Set default file location
$filePath = "$env:USERPROFILE\downloads"

$base64AuthInfo = [Convert]::ToBase64String([Text.Encoding]::ASCII.GetBytes(("{0}:{1}" -f "",$privateToken)))
$headers = @{Authorization=("Basic {0}" -f $base64AuthInfo)}

# ADO Project settings
$organisation = "myorganisation"
$serverUri = "https://dev.azure.com/$organisation"
$project = "myproject"

$startDate = Get-Date

$query = "GUID of query, extract it from the url"

$outputfile = "$($filePath)\Release UAT $(Get-Date $startDate -f 'yyyy-MM-dd').html"
$relnotesversion = "UAT$(Get-Date $startDate -f 'yyyy-MM-dd')"

# Format date to a proper British date :)
[System.Threading.Thread]::CurrentThread.CurrentCulture = "en-GB"; $niceStartDate = get-date $startDate -f 'dd MMM yyyy'
Some simple HTML styling
This is needed to get a nice layout.
$style = @"
body {
    color:#333333;
    font-family:Calibri,Tahoma;
    font-size: 10pt;
}

h1 {
    text-align:left;
}

h2 {
    border-top:1px solid #666666;
}

th {
    font-weight:bold;
    color:#eeeeee;
    background-color:#333333;
    cursor:pointer;
    text-align:left
}

.odd  { background-color:#ffffff; }

.even { background-color:#dddddd; }

@media print {
  @page { margin: 0; }
  body { margin: 0.5cm; }
  html { zoom: 80%;}
}
"@
A lot of building HTML
Creating the HTML to show the query contents into a table. Toned down to simplify it somewhat.
$pagetitle = "Release notes for UAT"
$pageheader = "<html><style>$style</style><body>"
$pageheader2 = @"
<title>{0}</title>
<h1>{0}</h1>
<table>
<tr><td width=180><b>Deployment for</b></td><td width=180>UAT</td><td width=180><b>Version</b></td><td width=180>{1}</td></tr>
</table>
<hr>
"@ -f $pagetitle, $niceStartDate

$pagefooter = "</table></body></html>"

$tableheader = "<table><th width=70>Id</th><th width=180>Type</th><th width=600>Description</th><th width=120>Status</th>"

Write-Host "Running query to collect data for release notes." -ForegroundColor Green

$url = "$serverUri/$project/_apis/wit/wiql/$($query)?api-version=7.1-preview.2"
$results = Invoke-RestMethod -Uri $url -ContentType "application/json" -headers $headers -Method GET

if($results.workItems.Count -eq 0) { Write-Host "No results were found, exiting."; return }

$workitems =@()
foreach($workitem in $results.workItems) {

    # Get info for this work item
    $url2 = "$serverUri/$project/_apis/wit/workitems/" + $workitem.id + "?fields=System.WorkItemType,System.Title,System.State,System.AssignedTo,System.Tags,Custom.Releasebranch&api-version=7.1-preview.3"
    $results2 = Invoke-RestMethod -Uri $url2 -Method Get -ContentType "application/json" -Headers $headers
    $workitemUrl = "$serverUri/$project/_workitems/edit/$($workitem.id)"

    $workitems += [pscustomobject]@{Workitem=$workitem.id; Url=$workitemUrl; Type=$results2.fields.'System.WorkItemType'; Title=$results2.fields.'System.Title'; Status=$results2.fields.'System.State';}
}

Write-Host "Release notes are being generated..." -ForegroundColor Green

Write-Output $pageheader $pageheader2 | out-file $outputfile
Write-Output $tableheader | out-file -Append $outputfile

$even = $false
foreach($workitem in $workitems) {
    if($even) { $rowcolor = "even" } else { $rowcolor = "odd" }
    Write-Output "<tr valign=top class=$rowcolor><td><a href='$($workitem.Url)'>$($workitem.Workitem)</a></td><td>$($workitem.Type)</td><td>$($workitem.Title)</td><td>$($workitem.Status)</td></tr>"| out-file -Append $outputfile
    $even = -not $even
}

Write-Output $pagefooter | out-file -Append $outputfile

Write-Host "File '$outputfile' has been generated." -ForegroundColor Green
Converting to PDF
We can send out HTML via email, but converting to PDF will result in a more consistent document.
# Change to correct extension
$pdffile = $outputfile.Replace("html","pdf")

Write-Host "Transforming to PDF." -ForegroundColor Green
if (Test-Path $pdffile) {
    Remove-Item $pdffile -Force
}

# Use Microsoft Edge to do the transformation
Start-Process "msedge.exe" -ArgumentList @("--headless","--print-to-pdf=""$($pdffile)""","--disable-extensions","--no-margins","--no-pdf-header-footer","--disable-popup-blocking","--run-all-compositor-stages-before-draw","--disable-checker-imaging", """file:///$($outputfile)""")

# Removing HTML file and showing PDF file
while (!(Test-Path $pdffile)) { Start-Sleep 1 }
if (Test-Path $outputfile) {
    Remove-Item $outputfile -Force
}

Start-Process $pdffile
Wrapping up
I have shown you a simpler version of the actual version, as it would be too extensive for this article. With these script you have a basic version to extend, maybe even add sending the release notes with the script.